Friday, 30 September 2022

Sofas and Chairs

If you're looking for something a little bit different yet stylish and very practical, have you seen the fabulous Fama furniture collection from Julia Jones


Innovative designs in a range of colours, the quality of the Fama furniture is good and this retailer, a family-run small business, has an excellent customer service ethic. 

Choose from lounging chairs and sofas, sofa-beds from 4ft width to 6ft widths, modular furniture - with a choice of fabrics and leather finishes. Recliner options are manual, battery and electric. 

We purchased a sofa-bed and swivel-recliner chairs a few months ago. Unfortuately, the delivery company damaged one of the chairs but Julia Jones ensured that this was replaced, as soon as possible, without fuss. We have been happily using the furniture all day, every day. With so many seating options, it's impossible not to be comfortable! 

And, just to be clear, this review was not requested nor have we received any financial incentive.


Wednesday, 20 January 2021

Choose your Style: Bathroom ideas

Bathrooms and Shower rooms. 

Do you prefer traditional or contemporary? Perhaps you'd like to accommodate both - for example, a traditional bathroom for a long relaxing soak after an energetic day plus a contemporary shower room to refresh your body and mind? Alternatively, go for a hybrid of the two.

Bathrooms.

The trend for traditional baths mixes styles from various Victorian to WW2 eras. The images below show free-standing baths near walls with wooden panelling to protect the plaster from bathwater splashes, especially from the 'hand-hose'.


The bath shown below is a nod to earlier times and probably costs a fortune but is gorgeous! Search Copper Bath for images to find simlar products in various shapes, including slipper baths.

feature bath

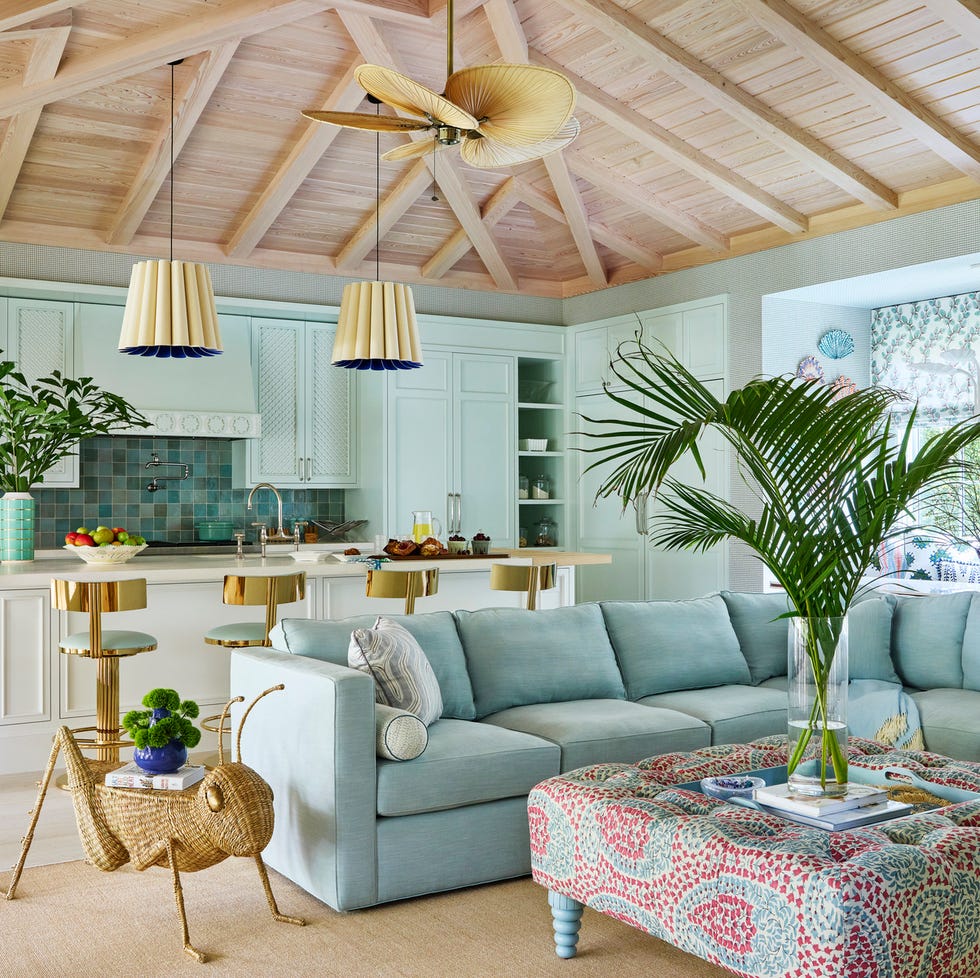
The image below shows another free-standing bath, sited in a bathroom with traditional units. These baths have been popular for many years, off and on, subject to having enough space in a bathroom. Note the use of traditional wall lights.

bathroom

Below is a more modern take on the above bathroom, yet it remains traditional with shaker units, panel and hidden cistern with wall-hung wc. The slatted wooden blinds are perfectly complementary.

bathroom

Below is a no-no or possibly a no-no-NO! Coloured suites date so quickly. In the 1970s, the (very) popular colour was avocado; in the early 1980s, it was Bermuda blue or a couple of pink shades; later that decade, more subtle colours were preferred - ivory cream and whisper grey. By the mid-1990s, it was back to 'playing safe' again and most of the coloured suits have now been ripped out and replaced by standard white, which rarely seems to get dated.


Not all contemporary bathrooms are white, but many are. Black, deep neutrals and/or natural stone are often featured heavily, as shown in the images below.

bathroom

bathroom

bathroom

Shower rooms.

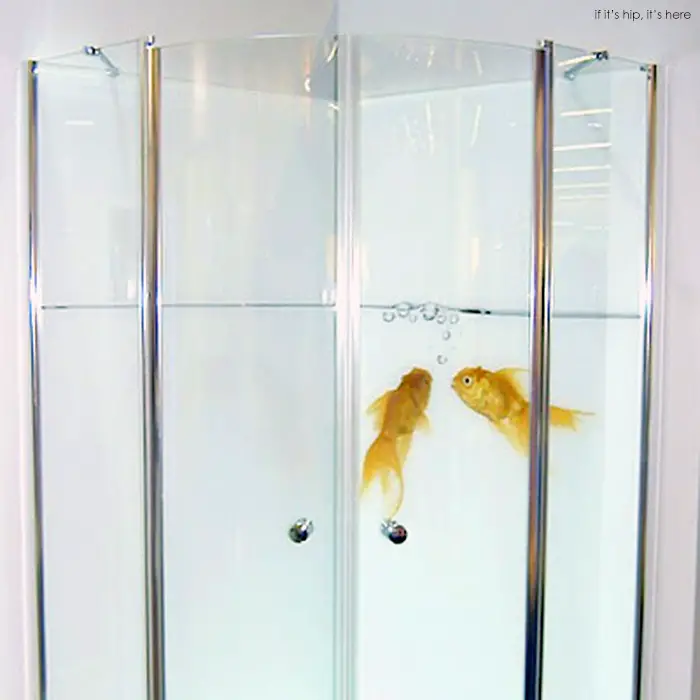
There is a trend for shower walls to be printed with fabulous photographic images: beaches, waterfalls, pebbles, etc., either from the suppliers' collection of prints or using a hi-res photo of your choice. These can be used to amazing effect but there are two considerations:

  • choice of image - ensure that it isn't too personal (for when you want to sell the house) and that it's an image that you won't tire of too quickly;
  • choice of medium - most suppliers print onto glass and this can be tricky for installation, e.g. cutting round the wall-mounted shower elements and access for repairs if something goes wrong in the wall behind the glass shower panel.

The following images are a selection of glass and acrylic printed shower panels: 


shower wall design
 
shower wall
 
shower wall design
 
shower wall design


shower wall
https://www.showerscape.co.uk/custom-designs

Follow this link for more ideas for your bath/shower rooms

The photographs used in this blog post were found on Google images. We do not have any rights to them. Image owners - please advise if they should be removed or acknowledged, thank you.

Friday, 4 December 2020

Bathroom Wall Panelling

Using waterproof vinyl or laminated panelling for bathroom walls and shower enclosures is becoming more popular than ceramic tiles.

Advantages of panelling over traditional tiles include faster installation and no grount to maintain.

There are various suppliers of panelling and we have chosen two examples to compare. Use this link and scroll down the page to Multipanel collections, probably the market leader. There is also another option which is a soft touch, light weight option from Vilo Moltivo, which is cheaper.

Both are available in lengths of 2.4 metres (standard room height) and suitable for bathrooms. 

Multipanel is a solid option, available in widths of 1200mm and 900mm (great for shower walls) and also 595mm width (great for splashbacks).

Vilo Moltivo has a much thinner profile and has a hollow construction. It is suitable for areas where there is little chance of damage. It is supplied in packs of 4 x 250mm panels (i.e. 1 metre) that click together.


Both systems require edge profiles - check with the supplier websites. The end-caps are for straight tops, bottoms and sides; there are also internal and external corner profiles. It is recommended that the you order the correct adhesive from the panelling suppliers. Warning: if you need an external corner profile for the Vilo system, they are not easy to find.

Glass Shower Walls

A more expensive but very stylish alternative to these panelling systems is glass. You may have seen glass splashbacks? They are also available in larger sizes for shower enclosures, wet-rooms, etc.. There are some amazing images available and some companies will custom-print from your supplied photographs.

The downside is cutting the template to install the plumbing - so be sure to choose a company that offers a full service.

image also available from shutterstock
The glass wall Palm Tree image is available from Purple Frog Interiors.


Friday, 18 September 2020

Home Improvement 2020 Style

During the past five years, the trend for clean lines, contemporary styles plus both cool and vibrant colours have dominated home improvement projects.
 
Bathrooms have become wetrooms or baths have been replaced by walk-in showers.
 
KITCHENS

This is most obvious in kitchens where, apart from timeless shaker units and a few country farmhouse kitchens, lines are sleek and sometimes curved, door finishes are often glossy and there is a plethora of side-by-side ovens in tall units with plus 'must have' kitchen islands.
 
Kitchen with curved island

Kitchen with aluminium slide-turn doors
 
GLASS DOORS & NATURAL LIGHT
 
A lantern roof for large extensions and full glass patio doors which facilitate as much daylight as possible are the 'WOW' factor of many homes now, from small terraced houses to large detached abodes. The sleek lines afforded by aluminium frames are popular for such doors, eclipsing PVC (except on price) and timber frames (where a traditional look is desired).
 
Lantern roof
 Fully openable slide & swing enclosure doors + glass balustrade

In some radical renovations, radiators have been thrown in the skip (or, better still, recycled by scrap metal merchants) and replaced by underfloor heating. 
 
Follow the "adventures" of a 2020 New Build Project.

Wednesday, 10 April 2019

Quick DIY Guide to Recovering Your Chairs

If your dining chairs need a makeover, why not do it yourself? In addition to a chair and your chosen fabric, you will need some decent scissors and a staple gun. 

Quick DIY Guide to Recovering Dining Chairs


Before you begin:
  • If you are going to rub down wooden chairs for light waxing, woodstain or painting, perhaps spray-paint cane or metal chairs - do that first.
  • Choose a strong fabric as it shouldn't crease too much from 'bums on seats'. Maybe you have some left-over curtain material or, if buying some fabric, think about getting a little extra to use as matching or contrasting cushion covers. If using patterned fabrics, make sure you consider this before you start cutting.
Instructions:
1. If you are covering the chair back (see top image):
  • First, the back of the chair back: cut a rectangular shape about 3" / 7cm larger than the area to be covered.
  • Pull the fabric straight and tight at the sides and top to create a smooth appearance and staple along the edges to hold the fabric in place, folding neatly at the corners. Trim and fold any excess material as you work, to keep it neat. 
  • Gently pull the bottom of the fabric down tightly and tuck under the back of the chair. Staple it underneath the seat. For a neat finish, fold the raw edge of the surplus under itself and staple again.
  • Next, matching any patterns, cut another piece of fabric for the front of the chair back, again with an additional 3" / 7cm to spare at the the edges. Push the edges of the fabric into the part where the chair back and seat meet.
  • Again, keeping the fabric tight and starting at the top of the chair back, fold the edge of the fabric under itself at the back edge, then staple close to the fold. Leave a gap at the edges while you fold and staple the sides of the chair back, keeping the fabric straight and  at all times.
  • Pull and tuck the bottom edge behind the seat, securing it tightly by stapling at the edges.
  • Envelope-fold and staple the top corners. Stand back and admire!
2. To cover the chair seat:
  • Matching up the pattern with the front of the chair back, cut an oversized square, large enough to cover the seat and its side edges, plus a little extra for folding under. 
  • Taking care with pattern matching, the fabric at the rear of the seat should be tucked in where it meets the chair back, folding the raw edges under at each side of the seat and stapled in place.
  • Pull the front tight and staple underneath the front of the seat, folding and trimming for neat corners.
  • Turn the chair upside down to finish off by folding the raw edges of the fabric and stapling.
3. Other notes:
  • If the fabric is liable to stains, consider treating it with a protective spray. 
  • If the staples are too obvious (e.g. on a plain fabric) you can fix a braid over them or use decorative tack nail studs. These are now available in a fantastic range of colours, not just brass.
This is a guide only! Please practice before you tackle your best dining chairs.

Instructions relate to the style of chair in the top image. Please adjust the instructions for chairs of a different style, such as shown in the image below (in this case, it would be best to remove the chair back before covering).

Upholstering Dining Chairs

Friday, 29 March 2019

Patio Doors - a Wall of Glass or Air!

There are some beautiful and practical patio doors available now.
In this post, I'll list some of the popular styles with links for further exploration.

Bi Folding Doors
Bi folding doors, first introduced around 2002, comprise a series of glass doors that are hinged, concertina zig-zag style. Previously known as folding-sliding doors because they fold as they are pushed to slide to one side of the opening between house and garden.

When closed, the doors provide good views between  frames.

Bi folds are retractable doors. This means that all the doors can be pushed to the sides so that virtually the whole of the gap can be used - great for parties!

Frame widths vary. In the above image, the doors have aluminium frames, which are the slimmest option and can be ordered in almost any colour you can imagine (search: RAL colours). Wood/timber frames and PVC/composite frames are also available.

If your budget is tight, you can purchase DIY kits and create a hole-in-the-wall to the relevant dimensions but the project should be undertaken by a reputable builder or it could be more costly in the longer term.  If you can afford to invest a bit more, bi folds can be made to measure and installed by the manufacturers - if anything goes wrong, you don't have the supplier and builder blaming each other.

There is a UK glass door designer/manufacturer whose main sales have switched from bifolds to slide-pivot-stack style doors over the past few years. An innovative development that removed the need for hinges, making the doors lighter and the frames narrower.

UltraSlim retractable doors
These fully retractable doors have a main door which pivots open like any normal door - them comes the magic! The next door can slide towards the open door then also open like a normal door, parallel to the first door, so that you have a double width gap for access.

Guess what - the next door does the same thing; then the next door, and so on. However, you don't have to have all doors open. If you want to walk through the centre or the other end of the opening, just slide the doors along until the gap or gaps are where you want them. Brilliant!

The originators of UltraSlim slide-pivot doors make the doors to order, in their UK workshop, and install them in the quoted price. For further details, just search for SunSeeker UltraSlim doors.

If you have "exceptional" architecture, you may be interested in IQ Glass or Sightline Doors.

Saturday, 8 December 2018

Planning your Tiling Project

"How hard can it be to stick a few tiles on a wall?" Many first-time D-I-Y tilers are tempted to start at a corner and work their way along. An experienced tiler with pride in his work will plan the job better for a professional finish.

As you can see from the mis-aligned tiles, this job wasn't properly planned!

A few points to consider:
  • Don't assume that any wall, floor or ceiling is perfectly straight, vertical, horizontal or flat. 
  • Don't assume that a measurement across one area (e.g. left to right at skirting level) will be the same at another level (e.g. worktop height).
  • Work out how many spaced tiles (i.e. allowing for grout) will fit across a space, both left to right and top to bottom. To avoid awkward cuts, determine whether it will be better for the centre of the visible area to be the centre of a tile of where the tiles meet.
  • Using a spirit level (and, where necessary, a plumb line) mark straight lines on the wall/floor as guides to keep your tile lines consistent as you work.
  • Use sufficient adhesive. If there are significant gaps, this can result in tiles cracking under pressure. It is especially important on floors.
Note that, sometimes, you will have to plan for pleasant sightlines when you prepare your project. for example, if wall tiles are at eye-level or above a work top, pay more attention to this area than where they meet the floor or ceiling.

tiled bathroom
An example of a well planned tiling project.
Note the half-tiles are cut to meet the floor.
One final thing - just because someone says he or she is an experienced, professional tiler does not mean that they are! Ask to see examples of their work and check their proposal for your tiling project before you say yes. If possible, when they start tiling, offer to bring them cups of tea so that you can check their work :)

Best of luck! Feel free to post comments and provide photographs of your projects, good or bad!